WordPress User Roles: What They Are and How to Use Them
If you’re the only person who accesses your WordPress site, keeping track of who does what is simple. However, many sites have multiple users with individual accounts. You don’t want to risk giving anyone access to options and features they’re not supposed to engage with.
In particular, if you’re designing Beaver Builder websites for clients or if you have multiple users editing the content on your own site, you might be interested in restricting access to some of Beaver Builder’s editing and admin capabilities.
For example, you might want to enforce a page template by allowing users to edit Beaver Builder content but not move rows, columns, or modules in the page layout.
That’s where the concept of user roles come into the picture.
This is WordPress’ default functionality for organizing all the users on your site into specific categories, each with its own set of permissions. User roles enable you to better collaborate with team members, avoid potential security issues, permit varying levels of access to your site, and much more.
In this post, we’re going to explain what WordPress user roles are and how they work. Then we’ll walk through the default options and offer some advice for how to apply them effectively. We’ll see how Beaver Builder allows you to control user access to its editing and admin areas.
Finally, we’ll explore your options for adding custom user roles to your site.
Let’s get right to it!
An Introduction to WordPress User Roles
When it comes to your WordPress website, a user is anyone with a WordPress account. This can include employees and team members. For example, if you have multiple writers and editors working to create content for your blog, each one will likely have their own account.
Users can also be members of your community. An e-commerce site might permit customers to create accounts in order to track their purchases, for instance, while a forum may require people to sign up before posting messages.
No matter who they might be, every user on your site is assigned a role. This role determines what that person can and cannot do on your site. That includes:
- Which sections of your site they can view in the back end
- The types of content they are able to create, edit, and delete
- Changes they can make to the site as a whole (such as adding plugins or altering settings)
The most common role – and the one your account most likely falls under – is Administrator. Someone with this role is able to do just about anything they want. Other roles are more restricted. For instance, an Editor can manage posts created by any other user, while an Author can only make changes to their own posts.
Why User Roles Are So Important
At this point, you may be wondering why the user role system exists. As it turns out, this system is vital for a number of reasons, some obvious and others less so.
Here are some of the primary benefits of WordPress user roles:
- They help to reduce security risks on your site by denying access to key features and settings from all but the most trusted users.
- They’re also useful for preventing mistakes by well-meaning users – such as a writer who might accidentally delete the wrong post or uninstall a crucial plugin.
- They create a clear hierarchy of users on your site, which is especially valuable if you have a lot of accounts.
- They provide a path for promotion to roles with more privileges as users prove themselves trustworthy.
- They can be combined with various other WordPress features, including those added by many plugins. For example, you could use a plugin to add restricted members-only content to your site, and then decide who is allowed access to that content by specifying one or more user roles.
For these reasons and more, it’s essential to make sure that every user on your site is assigned the correct role. To do that, you’ll first need to become familiar with all the options – let’s look at those now.
The Six Default WordPress User Roles (And How to Use Them)
By default, WordPress offers six user roles. We’ll examine each role in turn and offer some advice about how to best use it.
1. Super Admin
This role is a little different from all the others on this list because it only applies to WordPress Multisite setups. WordPress Multisite is a feature that enables you to manage more than one website from a single account – connecting the various sites while still allowing each one some autonomy.
If you’re running a standard WordPress website, you won’t need a Super Admin. On a multisite setup, however, this role is essential. The Super Admin is the person who has full access to the entire network of sites.
Super Admins can:
- Create and delete websites
- Manage sites and users on the network
- Add, remove, and manage plugins and themes on the network
Naturally, the Super Admin is a very powerful individual. In almost all cases, it’s best to have only one person with this role. They’ll be responsible for managing the overall network and will likely leave individual website management to a team of Administrators.
2. Administrator
On a standard (non-multisite) WordPress installation, this is the most powerful user role. An Administrator has access to the entire back end, plus all authoring privileges.
Administrators can:
- Create, modify, and delete content
- Manage user accounts
- Modify settings
- Install and remove plugins and themes
- Edit files
- Update WordPress core, themes, and plugins
- Import and export content
Again, it’s usually smart to have only one Administrator per site. This reduces the risk of security breaches, as well as unintended and contradictory changes. If you choose to have more than one Administrator, you’ll want to keep the number of users with this role to an absolute minimum and ensure that you only grant it to people you trust with full power over your site.
Note that Administrators on multisite setups have a slightly different set of permissions, as some of the items on the above list are reserved only for Super Admins. For more details on the differences between regular and multisite Administrators, you can check out this Codex entry.
3. Editor
The Editor role is specifically designed to oversee website content, both for themselves and for others.
Editors can:
- Create and edit posts, pages, and other content types
- Edit, publish and delete content created by other users
- Manage categories, links, and comments
Editors are restricted from managing administrative aspects of the site. They can’t install plugins and themes, make changes to site settings, or process updates.
It’s a good idea to keep your pool of editors relatively small, but this role comes with fewer security risks.
4. Author
As the name implies, an Author is someone who can only create and publish their own content.
Authors can:
- Create, edit, delete and publish their own posts (but not pages)
- Upload files (such as images and videos) and access the Media Library to add media to their posts
Authors cannot make any changes to pages, and they cannot edit or publish posts created by other users.
The Author role is perfect if you have a large team of content creators. Be aware that Authors can publish their own content without prior approval, which can still be a risk.
That’s where the next role comes in handy.
5. Contributor
Contributor is a scaled-down version of the Author role.
Contributors can:
- View posts by all users
- Create and edit their own posts and submit them for review
- Delete their own posts
Contributors are not able to publish content. An Editor role or higher needs to review the posts and publish them as needed. Contributors also cannot upload content or access the Media Library to add media to their posts.
This makes Contributor a useful role for one-time content creators, or writers you don’t yet trust with a wider set of permissions. It’s often useful to start new writers out as Contributors, and then graduate them to the Author role when you feel that they’ve proven themselves.
6. Subscriber
Finally, we come to the most restricted role of all.
A Subscriber is able to do only one thing on your site:
- Read content
In other words, Subscribers can view your site’s posts, pages, and other content. They are also able to view and manage their own user profiles. Other than that, they can’t access or modify any site features.
At first glance, this role may seem a little pointless. However, it’s very useful on any site with a membership component. You can restrict some or all of your site’s content to anyone with a Subscriber role or higher, meaning that people will need to create an account before viewing content.
Even if your site doesn’t have a membership component, this role still enables users to manage their own accounts.
This is handy on a wide range of websites.
How to Manage WordPress User Roles
Now that you know what the user role options are, you’ll want to know where you can find them on your site. Only Administrators and Super Admins can view and edit users and user roles. If you have one of those roles yourself, from the WordPress admin panel go to Users > All Users:
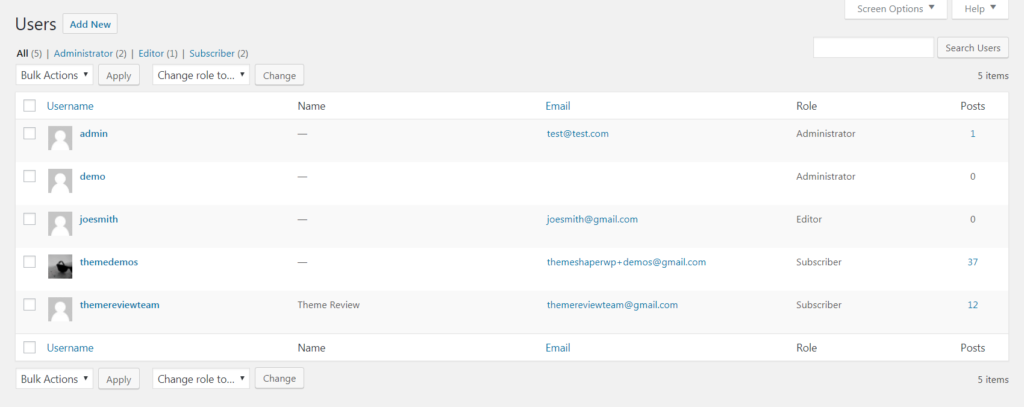
You’ll see a list of all the users on your site and the role each user is assigned. To change a user’s role, click Edit under their username and scroll down to the Role option:

Select the role from this drop-down menu and save your changes.
After ensuring that all of your site’s current users are assigned the correct roles, you can set the role that new users are assigned by default at Settings > General > New User Default Role.

As a general rule, don’t set this any higher than Contributor.
Beyond Roles: Capabilities
The tasks that we’ve described that are associated with each role are actually handled by WordPress capabilities. Capabilities are also commonly called tasks or permissions. Roles and capabilities are described in this WordPress Codex article.
Some plugins add custom user roles and capabilities or assign new capabilities to existing roles.
For example, WooCommerce allows a buyer to create an account, which is assigned the role of Customer. It also adds the role of Shop Manager, so you can assign someone to manage sales on your site.
See the documentation on WooCommerce roles and capabilities.
How Beaver Builder Uses Roles and Capabilities
You can use user roles and capabilities to determine who has access to view and edit Beaver Builder layouts and also to control the visibility of rows, columns, and modules when they are rendered on your web pages.
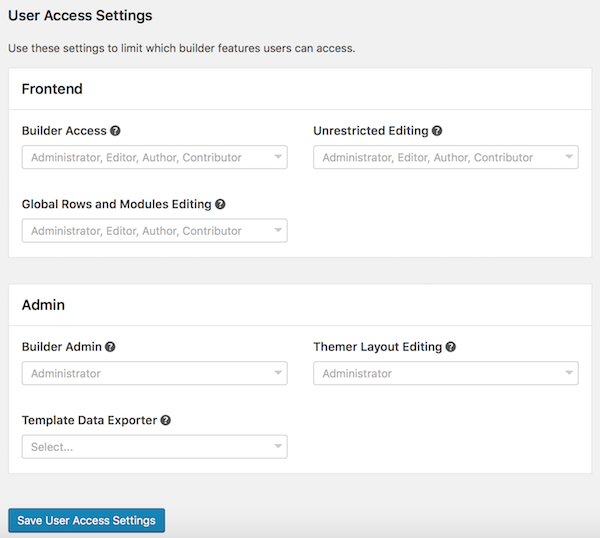
In Settings > Beaver Builder > User access, you can control which roles have access to the Beaver Builder editor, which Beaver Builder editing capabilities they have access to, and who has access to the Beaver Builder admin features. See the Beaver Builder Knowledge Base article on user access control for more information.
For individual rows, columns, and modules, the Display field on the Advanced tab lets you limit visibility to Logged-in users only. With this setting, you can also choose to limit the display to those users with a particular capability. For example, you could limit logged-in users to the ones whose capabilities include edit_posts.
On your web page, that item would be visible to logged-in users who are Contributors and higher but not visible to Subscribers. See this Knowledge Base article about changing visibility.
Adding Custom User Roles to Your Site
As described in this article, the default WordPress user roles make it possible to set up a flexible hierarchy of users on your site. However, some people find that the six built-in roles don’t provide the fine-tuned control they’re looking for.
If you want to create your own custom roles or change the capabilities that come with the built-in roles, the most flexible plugin is the popular User Role Editor plugin:
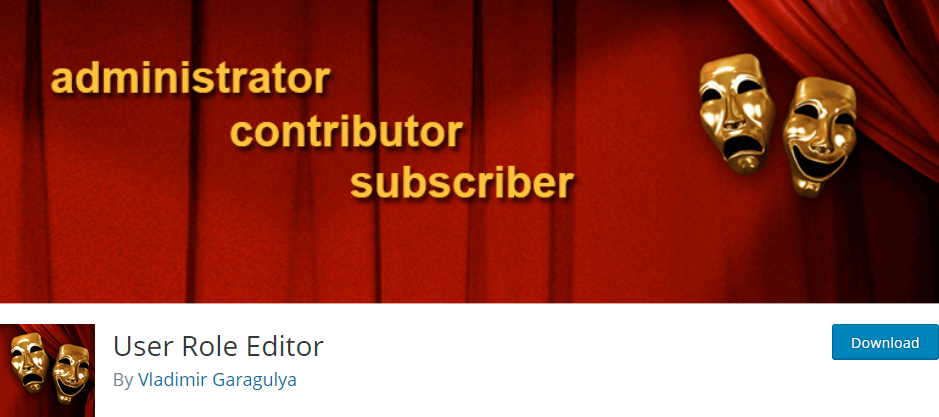
You can set up your own fully-customized user role system and decide what capabilities are included with both the built-in and custom roles.
For more details about using this plugin, check out the developers’ documentation.
Conclusion
As a platform, WordPress offers you a lot of freedom over its setup and customization. This flexibility is useful, but you can limit users’ ability to make changes by assigning each user a role that determines what they can and can’t do on your site.
You can keep the list of users with access to key features small and bring in other users with minimal permissions. You can even customize your site’s user roles and add new ones by using a plugin.
Do you have any other questions about how to apply WordPress user roles effectively on your website? Let us know in the comments section below!
2 Comments
Related articles
LifterLMS and Beaver Builder Integration: Effortless Online Course Websites
Introducing the LifterLMS and Beaver Builder integration. Streamline your online course website creation by combining powerful learning management tools with…
Figma to Beaver Builder: Design and Build WordPress Sites
Curious about converting Figma designs into WordPress websites? A smooth design-to-development workflow is essential for saving time and delivering top-notch…
Best Practices for Managing Web Design Clients
Managing web design clients effectively is one of the most crucial skills for a web designer, agency, or freelancer. Whether…
Join the community
We're here for you
There's a thriving community of builders and we'd love for you to join us. Come by and show off a project, network, or ask a question.
Since 2014
Build Your Website in Minutes, Not Months
Join Over 1 Million+ Websites Powered By Beaver Builder.
 Beaver Builder

Nice work on this post, Anthony! 🙂
Thank you Alex. Appreciate it =)