How to Create a Color Palette for Your WordPress Site (2 Methods)
Choosing a color scheme for your website comes with a handful of benefits. In addition to boosting the appeal and appearance of your site, it can help strengthen your branding and communicate your values. Therefore, it’s a smart idea to create a color palette for your brand. Fortunately, doing so is easy when you use our Beaver Builder plugin.
In this post, we start by discussing the benefits of creating a color palette for your WordPress site. Then we show you how to create one using Beaver Builder. We also offer some tips for choosing the right colors. Let’s jump in!
The Benefits of Creating a Color Palette for Your Website
Colors are an important part of branding. They can help with brand recognition and enable shoppers to more easily remember your products or service. The right color scheme can also demonstrate professionalism and credibility.
Research has shown that certain colors tend to evoke particular emotions from consumers. Therefore, it’s important that you choose your colors wisely. The right color scheme can help you:
- Boost conversions
- Increase sales and drive revenue
- Strengthen your branding and online presence
- Encourage return visitors
- Improve engagement rates on your website and social media
- Establish trust and authority
The first step is to choose colors and create a color palette so that you have a set color scheme to work with. If you work with multiple team members, it also helps keep everyone on the same page. Moreover, it ensures a professional and cohesive look across all of your platforms, including your social and marketing channels. See our tips for selecting colors below.
The second step is to set up a system on your site so you can easily grab colors from your palette across your pages.
There are many ways to create a color palette for your website. For example, you could use third-party platforms and tools to experiment with different shades and tones, such as the Color Calculator from Sessions College or Coolors. When you’re using the color scheme for your WordPress site, you can combine the first and second steps by creating and implementing your palette within WordPress itself. If you’re a Beaver Builder user, this process is quick and easy. Let’s take a closer look at how it works.
How to Create a Color Palette for Your WordPress Site (2 Methods)
In case you’ve never used it before, our Beaver Builder plugin is a page-building tool that you can use to create and edit your site. It comes with an intuitive, real-time, front end editor:

There is a free Beaver Builder WordPress plugin available. This tool lets you do everything we discuss in this post regarding the creation of a color palette for your website.
If you want to unlock access to our full suite of features and tools, we recommend upgrading to a premium plan. After you sign up, you can download the plugin from your account dashboard.
If you’re already using the Beaver Builder plugin, you can upgrade by navigating to the Plugins page in your WordPress admin dashboard. Under Beaver Builder, click the Upgrade link.
After you have your Beaver Builder plugin installed and activated, there are two main methods that you can use to create a color palette: manually and programmatically. In the next sections, we show you how to do both.
* Note that if you choose Method 2, you should keep all your colors in your code, because it overrides any manually set colors.
1. How to Add Custom Color Presets Manually
The first method uses a manual approach to create a color palette with Beaver Builder. This is a handy option if you don’t have any coding experience, or if you don’t want to mess with any of your site’s files.
To get started, navigate to a post or page in WordPress, then click the Launch Beaver Builder button in the editor. This launches the page builder’s interface.
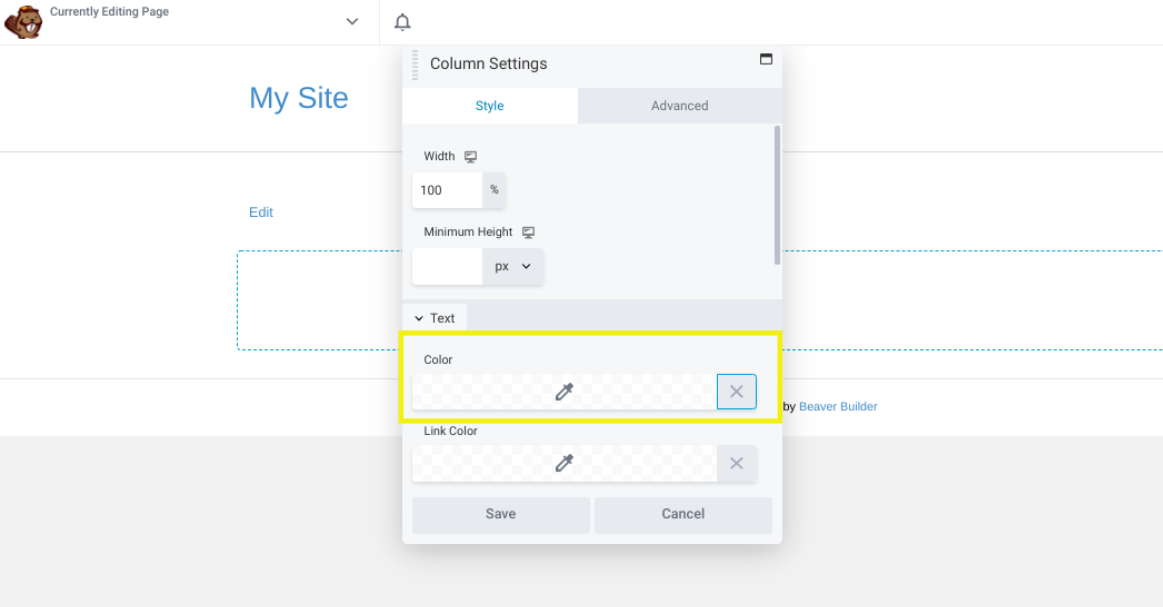
Next, click the Color field for a row, column, or module:

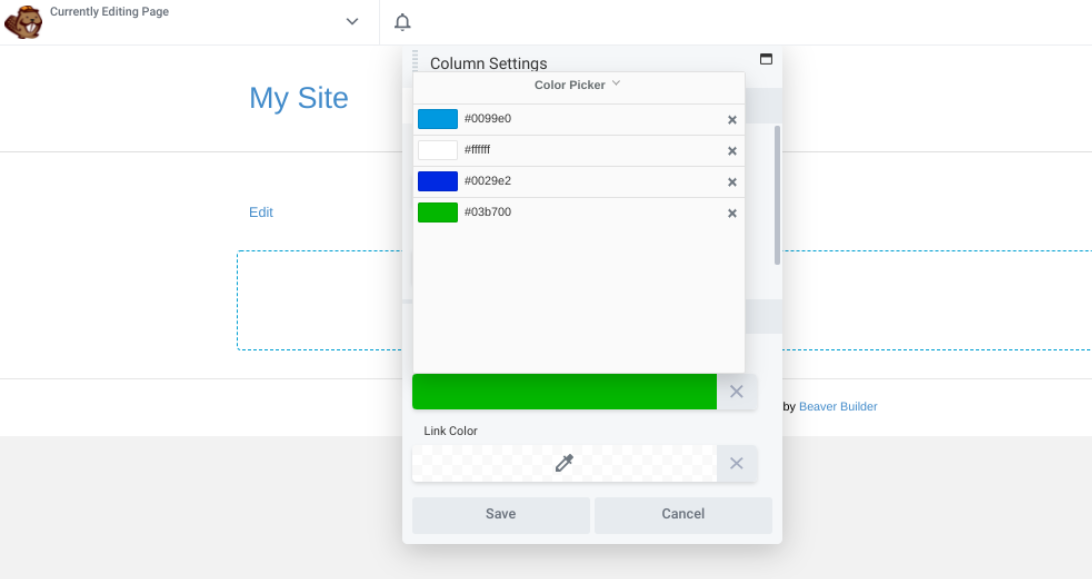
This opens the Color Picker. Here, you can choose the first color that you want to add to your palette. Alternatively, you can enter the hex number of your preferred color:

After you select your color, you can click the (+) icon in the top right-hand corner of the Color Picker. You can repeat this process for every color you want to add.
When you’re ready, click Color Presets at the bottom of the panel. Here, you can review the color presets that you’ve created:

If you want to delete a color, you just need to click the X icon. After you’re done, save your changes.
2. How to Add Custom Color Presets Programmatically
The second method is to add custom color presets programmatically. We only recommend this approach if you’re comfortable working with code and editing your website’s files. Otherwise, it’s best to use the manual approach.
To add the presets programmatically, first delete any existing colors that you have saved in Beaver Builder. To do so, open a page for editing in Beaver Builder.
Click inside any module that uses color, choose a color field, and click Color Presets. Delete any options that you previously saved by clicking on the X icon next to each color. Exit the editor.
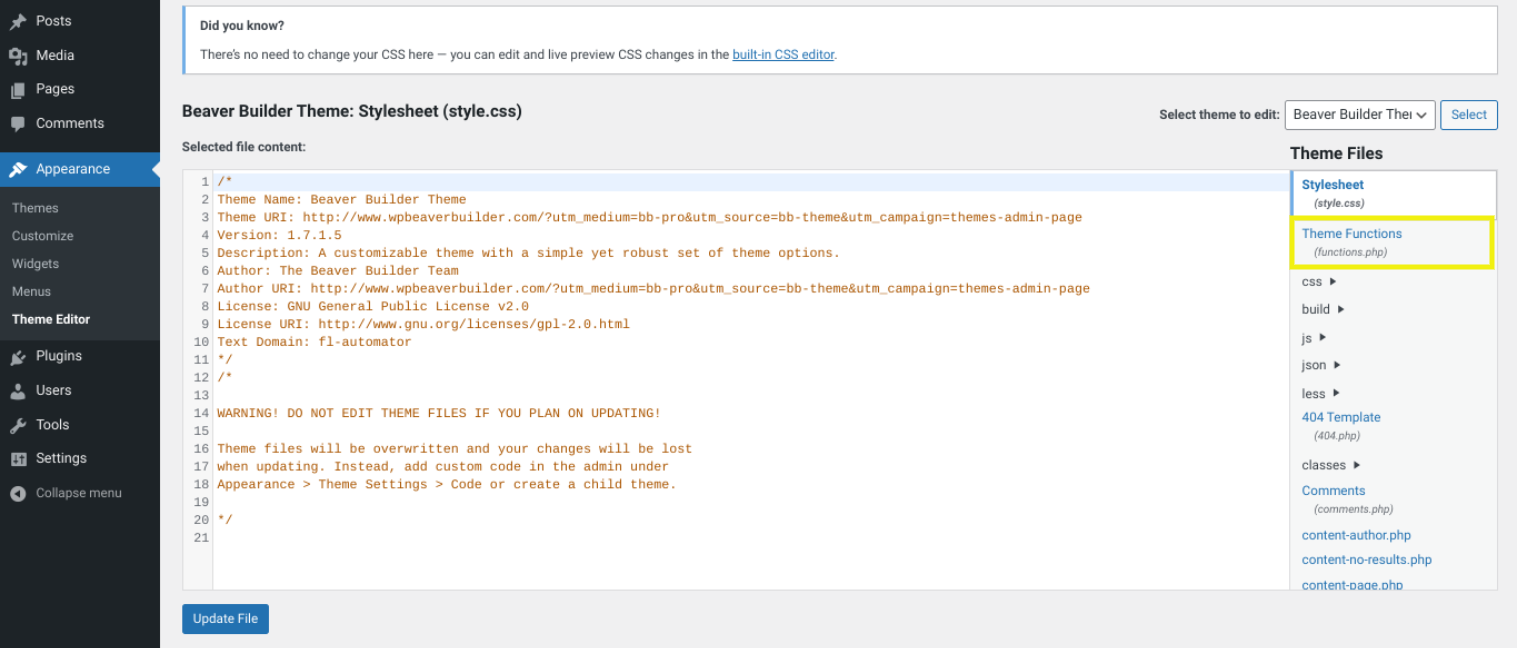
Then add code to your child theme‘s functions.php file. You can do this by navigating to Appearance > Theme Editor from your WordPress admin dashboard, then clicking Theme Functions in the right-hand menu:

After the file is open, you can append the following code with all the hex colors for your palette. This code adds color presets to Beaver Builder and Beaver Themer but does not affect color selection in your theme:
//Add color presets for Beaver Builder
function my_builder_color_presets( $colors ) {
$colors = array();

$colors[] = '8E181B';
$colors[] = 'D11C23';
$colors[] = '1A4688';
$colors[] = 'D6E1EE';
$colors[] = 'fdfffc';
$colors[] = 'f1d302';

return $colors;
}

add_filter( 'fl_builder_color_presets', 'my_builder_color_presets' );
Make sure to replace the hex values in this sample code with those for the colors that you want to use in your palette. You can also add or delete lines based on how many colors you want to include.
Note that you don’t need to use the “#” symbol with the hex color values that you enter. When you’re done, remember to save the file in order to publish your changes.
Tips for Choosing a Color Palette for Your Website
At this point, you should know how to create a color scheme for your website using Beaver Builder. However, you might still be struggling with deciding exactly which colors to use.
As we mentioned earlier, your website colors can have a major influence on consumers’ perception of your brand and products. Therefore, it’s a decision to make after careful consideration and research.
To help make this process easier, here are a few tips you may want to keep in mind.
Consider Color Psychology
When choosing colors for your website, it’s important to first understand how colors can affect people’s thoughts, feelings, and behaviors. This is referred to as “color psychology.”
Color psychology research has shown that certain colors can evoke certain emotions. For example, red is usually associated with boldness and excitement. Blue is often tied to trust, honesty, and loyalty. Meanwhile, green signifies growth and health, which is why it’s often used by eco-conscious brands.
Color psychology doesn’t need to be the driving force behind your decision but it’s good to know about it during the selection process. After all, the goal should be to draw a positive emotional response from your visitors.
Keep It Simple
It can be easy to get carried away when creating a color scheme for your website but it’s important to remember that sometimes simpler is better.
If you try to combine too many colors, you risk your color palette becoming too busy or messy. This may end up distracting and confusing your visitors, which is the opposite of what you’re trying to accomplish.
Instead, we recommend starting out with two or three main colors. You can always add more items to your palette down the road.
Also, keep in mind that you can still incorporate other colors into your website, even if they aren’t part of your palette. The goal is to establish the main colors you want to use across the entire website and keep consistent with your branding strategy across your business.
Conclusion
The colors that you use on your website play a pivotal role in its success. They affect visitors’ impression of your brand, as well as your engagement and conversion rates. In order to communicate a cohesive and professional aesthetic, it helps to create a color scheme for your WordPress site.
As we discussed in this post, there are two methods that you can use to create a color palette in WordPress, using our Beaver Builder plugin. You can create one manually by launching the Beaver Builder editor and adding the colors to Color Presets. Alternatively, you can use a programmatic approach and add the color palette code to your theme’s functions.php file.
Do you have any questions about creating a color palette for your website? Let us know in the comments section below!
4 Comments
Related articles
Beaver Builder 2.9 & Themer 1.5: Multi-Layer Backgrounds, Enhanced Color Picker, Loop Module
We’re excited to introduce Beaver Builder 2.9, also known as “Coyote”, packed with exciting updates designed to simplify workflows and…
(UPDATED) New White-Label Beaver Builder Services!
A Note to Our Community We’re sorry if our new white-label services caused any confusion. We deeply value our agency…
LifterLMS and Beaver Builder Integration: Effortless Online Course Websites
Introducing the LifterLMS and Beaver Builder integration. Streamline your online course website creation by combining powerful learning management tools with…
Join the community
We're here for you
There's a thriving community of builders and we'd love for you to join us. Come by and show off a project, network, or ask a question.
Since 2014
Build Your Website in Minutes, Not Months
Join Over 1 Million+ Websites Powered By Beaver Builder.
 Free Beaver Builder Templates! Get started at


I like the first method. Thank You for help 🙂
Thanks for sharing this blog post. This is a great tip.
I tried method 2, and learned the hard way that it will override any additional colors you add manually using method 1. I wish it did not, as I often add more tints/shades to the preset palette during development.
Hi Karen, thank you so much for your feedback. Much appreciated. 🙂
We have added the following to the article to further clarify: Note that if you choose Method 2, you should keep all your colors in your code, because it overrides any manually set colors.